
Back-face Culling
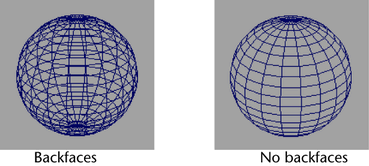
Una vez repasadas las operaciones vectoriales ya podemos introducir la técnica del Back-face Culling basada en desechar las caras invisibles de un modelo para ahorrarnos muchos cálculos de renderizado y aumentar considerablemente la optimización del sistema:
Para determinar si una cara se debe renderizar o no utilizaremos el vector normal de cada cara:
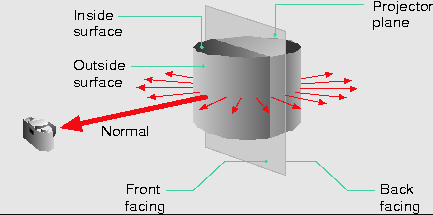
Si el ángulo formado entre el rayo de la cámara y el vector normal es menor de 90º consideraremos que la cara es visible por la cámara y la renderizaremos, en caso contrario será invisible y la desecharemos (culling).
El algoritmo de culling enumera los pasos para determinar si dibujar o no una cara formada por los vértices A, B, C:
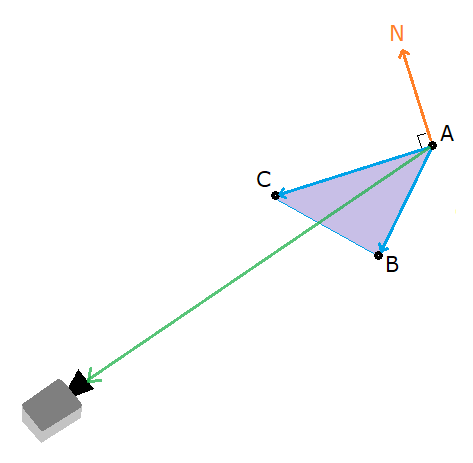
- Buscar los vectores
(B-A)y(C-A). - Hacer su producto vectorial y buscar la perpendicular normal
N. - Buscar el rayo de la cámara sustrayendo la posición de la cámara del punto
A. - Hacer el producto escalar entre la normal
Ny el rayo de la cámara. - Si el producto escalar es menor que cero no renderizar la cara.
Para aplicar este algoritmo en el código primero vamos a separar lo que son las transformaciones de las proyecciones en el Mesh para entre medio determinar si aplicar o no el back-face culling:
// Loop all vertice for the face and apply transformations
for (size_t j = 0; j < 3; j++)
{
    // Rotation
    triangles[i].RotateVertex(j, rotation);
    // Translation (away from camera)
    triangles[i].TranslateVertex(j, Vector3(0, 0, -5));
}

// Before project the faces check backface culling bypass


// Loop all vertice for the face and apply projections
for (size_t j = 0; j < 3; j++)
{
    triangles[i].ProjectVertex(j, window->fovFactor);
    // Translate the projected vertex to the middle screen
    triangles[i].projectedVertices[j].x += (window->windowWidth / 2);
    triangles[i].projectedVertices[j].y += (window->windowHeight / 2);
}
La parte del culling quedará:
/*** Back Face Culling Algorithm ***/
Vector3 vectorA = triangles[i].vertices[0]; /*    A    */
Vector3 vectorB = triangles[i].vertices[1]; /*  /   \  */
Vector3 vectorC = triangles[i].vertices[2]; /* C --- B */
// Get the vector substracion B-A and C - A
Vector3 vectorAB = vectorB - vectorA;
Vector3 vectorAC = vectorC - vectorA;
// Compute the face normal (corss product)
// Using our left-handed system (z grows inside the monitor)
// So we apply have to appky the order: AB x AC
Vector3 normal = vectorAB.CrossProduct(vectorAC);
// Find the vector betweenn a triangle point and camera origin
Vector3 cameraRay = window->cameraPosition - vectorA;
// Calculate how aligned the camera ray is with the face normal
float dotNormalCamera = normal.DotProduct(cameraRay);
// Test the dotNormalCamera and render the triangle if is >0
if (dotNormalCamera <= 0)
{
    // ByPass the current triangle
}
Podemos guardar en una variable booleana dentro del triángulo si renderizarlo o no:
class Triangle
{
public:
    bool culling = false;
}
Si no debemos renderizarlo le establecemos a false, o true en caso contrario. También podemos utilizar continue para ahorrarnos la proyección:
// Test the dotNormalCamera and render the triangle if is >0
triangles[i].culling = (dotNormalCamera < 0);
if (triangles[i].culling)
    continue;
Durante el renderizado comprobamos su culling está activado o no:
void Mesh::Render()
{
    // Loop projected triangles array and render them
    for (size_t i = 0; i < triangles.size(); i++)
    {
        // If culling is true bypass the current triangle
        if (triangles[i].culling)
            continue;
        window->DrawTriangle(
            triangles[i].projectedVertices[0].x,
            triangles[i].projectedVertices[0].y,
            triangles[i].projectedVertices[1].x,
            triangles[i].projectedVertices[1].y,
            triangles[i].projectedVertices[2].x,
            triangles[i].projectedVertices[2].y,
            0xFF00FFFF);
    }
}
Si probamos el programa de nuevo deberíamos saltarnos correctamente el dibujado de las caras que no están mirando hacia la cámara:
Normalización de vectores
Antes de continuar con el siguiente tema hablemos de lo que es y cómo implementar la normalización de vectores.
El vector normalizado u de un vector v con una magnitud y dirección, es el vector que únicamente indica su dirección:
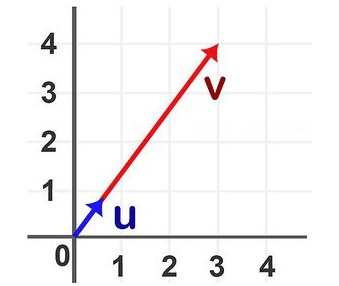
Si no necesitamos representar la longitud (o magnitud) del vector, lo ideal es normalizarlo, transformándolo en un vector unitario de longitud = 1.
La fórmula es muy simple:
Esto significa dividir cada componente del vector (v.x, v.y, v.z) entre la longitud del propio vector v.
Es algo interesante porque el vector normal es el clásico ejemplo de un vector que se debe normalizar, pues lo único que nos interesa de él es su dirección.
Así que vamos a implementar un método para normalizar el propio vector:
void Vector2::Normalize()
{
    float length = Length();
    x = x / length;
    y = y / length;
}
void Vector3::Normalize()
{
    float length = Length();
    x = x / length;
    y = y / length;
    z = z / length;
}
Aplicamos el método en el vector normal y también, ya que estamos, a los vectores vectorAB y vectorAC:
// Get the vector substracion B-A and C - A and normalize 'em
Vector3 vectorAB = vectorB - vectorA;
Vector3 vectorAC = vectorC - vectorA;
vectorAB.Normalize();
vectorAC.Normalize();
// Compute the face normal (corss product) and normalize it
// Using our left-handed system (z grows inside the monitor)
// So we apply have to appky the order: AB x AC
Vector3 normal = vectorAB.CrossProduct(vectorAC);
normal.Normalize();
El resultado será el mismo pero estaremos aplicando las buenas prácticas de normalización.
Refactorización 3
Creo que sería interesante trasladador todo nuestro código a un método ApplyCulling() propio de Triangle para abstraer todos los cálculos.
void ApplyCulling(Vector3 cameraPosition)
{
    // Get the vector substracion B-A and C - A and normalize 'em
    Vector3 vectorAB = this->vertices[1] - this->vertices[0];
    Vector3 vectorAC = this->vertices[2] - this->vertices[0];
    vectorAB.Normalize();
    vectorAC.Normalize();
    // Compute the face normal (corss product) and normalize it
    // Using our left-handed system (z grows inside the monitor)
    // So we apply have to appky the order: AB x AC
    Vector3 normal = vectorAB.CrossProduct(vectorAC);
    normal.Normalize();
    // Find the vector betweenn a triangle point and camera origin
    Vector3 cameraRay = cameraPosition - this->vertices[0];
    // Calculate how aligned the camera ray is with the face normal
    float dotNormalCamera = normal.DotProduct(cameraRay);
    // Test the dotNormalCamera and render the triangle if is >0
    this->culling = (dotNormalCamera < 0);
}
Simplemente substituiremos esa parte por nuestro método:
/*** Back Face Culling Algorithm ***/
triangles[i].ApplyCulling(window->cameraPosition);
// Bypass the projection if triangle is being culled
if (triangles[i].culling)
    continue;
Última edición: 05 de Junio de 2022