
Mapeado de texturas
El mapeado de texturas corresponde a la parte que se encarga de aplicar texturas sobre los modelos.
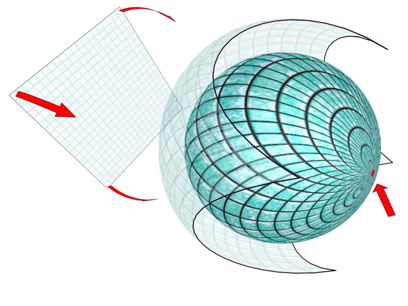
Los colores de la textura se organizan en texels, la unidad mínima de una textura aplicada a una superficie. Comúnmente se almacenan en una imagen para luego aplicarla sobre el modelo:
Esto nos lleva a pensar en cómo cargar esos texels en la memoria, mapearlos para hacerlos coincidir con los triángulos del modelo y escalarlos, pues no siempre coincidirá el número de texels con los pixels.
Para mapear las texturas sobre los triángulos debemos otorgar a los vértices la responsabilidad de encuentrar sus coordenadas respecto a las de la textura.
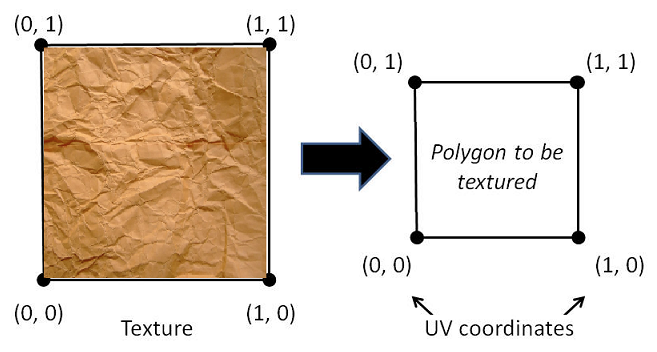
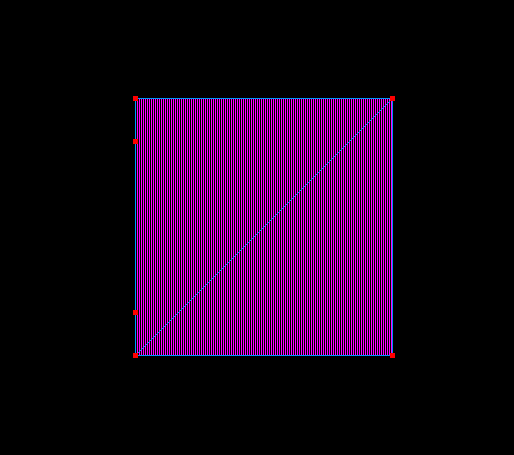
El sistema de coordenadas de la textura recibe el nombre de coordenadas UV y funciona en un rango normalizado de valores entre 0 y 1:
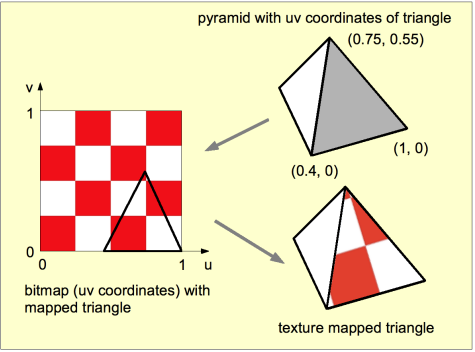
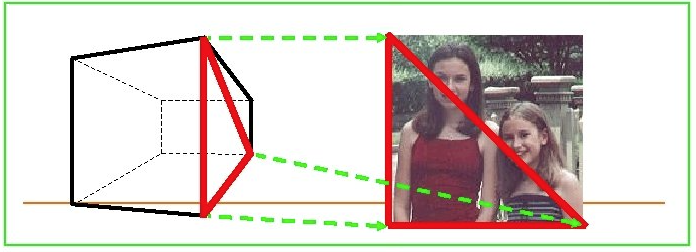
El mapa UV de una textura contiene la información que necesita el vértice del modelo, apuntando exactamente al lugar que tiene que aplicar sobre la superficie del triángulo:

Será nuestra tarea interpolar los valores de la textura entre los vértices del mapa UV para cambiar los píxeles del color buffer acordemente:
Texturas en la memoria
Vamos a ponernos manos a la obra implementando el texturizador texture.h:
#ifndef TEXTURE_H
#define TEXTURE_H

class Texture2
{
    float u;
    float v;
};

#endif
Por ahora vamos a trabajar con una mock texture hardcodeada hasta que la pueda importar de una imagen, así que en window.h crearé su configuración:
/* Raw texture settings */
int textureWidth;
int textureHeight;
uint32_t* meshTexture{nullptr};  // 32bits for colors
uint8_t* REDBRICK_TEXTURE{ nullptr };  // 8bits for raw mock texture
Los datos harcodeados los inicializaré en el window.Setup como memoria dinámica:
/* Texture loading */
REDBRICK_TEXTURE = new (std::nothrow) uint8_t[16400] {};
meshTexture = (uint32_t *)REDBRICK_TEXTURE;
El contenido de la textura lo adjunto en este enlace.
Al ser memoria dinámica la vaciaré en el destructor ~Window:
delete[] REDBRICK_TEXTURE;
En este punto vamos a añadir a la cara del triángulo las coordenadas UV para cada vértice:
#include "texture.h"

class Triangle
{
public:
    Texture2 textureCoords[3]{};
};
Antes de continuar añadiré a la interfaz la opción de dibujar o no las texturas:
/* Configurable options */
bool drawTexturedTriangles = true;

ImGui::Checkbox("Dibujar texturas", &this->drawTexturedTriangles);
En el mesh.Render comprobaremos la opción y llamaremos a la nueva DrawTexturedTriangle:
// Triángulos texturizados
if (window->drawTexturedTriangles) {}
Antes de ponernos con la implementación de esta función, vamos a volver a activar nuestro mock cube porque vamos a añadirle la información de las coordenadas UV:
textureWidth = 64;
textureHeight = 64;
Texture2 meshTextureUVs[]{ {0,0},{0,1},{1,1},{0,0},{1,1},{1,0},  {0,0},{0,1},{1,1},{0,0},{1,1},{1,0},  {0,0},{1,1},{1,0},{0,0},{0,1},{1,1},  {0,0},{1,1},{1,0},{0,0},{0,1},{1,1},  {0,0},{1,1},{1,0},{0,0},{0,1},{1,1},  {0,0},{0,1},{1,1},{0,0},{1,1},{1,0} };
mesh = Mesh(this, meshVertices, 8, meshFaces, 12, meshColors, meshTextureUVs);
El constructor de mesh recibirá las texturas y las utilizará para crear los triángulos:
Mesh::Mesh(Window *window, Vector3 *vertices, int verticesLength, Vector3 *faces, int facesLength, uint32_t *colors, Texture2 *textureUVs)
{
    // Initialize the dinamic faces and empty triangles (same number)
    for (size_t i = 0; i < facesLength; i++)
    {
        this->faces.push_back(faces[i]);
        Texture2 triangleTextureUVs[] { textureUVs[i*3], textureUVs[i*3+1], textureUVs[i*3+2] };
        this->triangles.push_back(Triangle(colors[i], triangleTextureUVs)); // con color y texturas
    }
};
El nuevo constructor de triángulo recibirá este array de texturas y las inicializará:
Triangle(uint32_t color, Texture2 *textureUVs) : color(color), originalColor(color) {
    textureUVCoords[0] = textureUVs[0];
    textureUVCoords[1] = textureUVs[1];
    textureUVCoords[2] = textureUVs[2];
};
Enviaremos las textureUVCoords al método de renderizado DrawTexturedTriangle:
// Triángulos texturizados
if (window->drawTexturedTriangles)
{
    window->DrawTexturedTriangle(
        sortedTriangles[i].projectedVertices[0].x, sortedTriangles[i].projectedVertices[0].y, sortedTriangles[i].textureUVCoords[0],
        sortedTriangles[i].projectedVertices[1].x, sortedTriangles[i].projectedVertices[1].y, sortedTriangles[i].textureUVCoords[1],
        sortedTriangles[i].projectedVertices[2].x, sortedTriangles[i].projectedVertices[2].y, sortedTriangles[i].textureUVCoords[2],
        window->meshTexture);
}
En este punto vamos a crear la nueva función DrawTexturedTriangle que recibe los vértices, las coordenadas UV y la textura:
void Window::DrawTexturedTriangle(int x0, int y0, Texture2 t0, int x1, int y1, Texture2 t1, int x2, int y2, Texture2 t2, uint32_t *texture)
{
    // Iterar todos los píxeles del triángulo para renderizarlos en función del color de la textura
}
Triángulos texturizados
El proceso de dibujar el triángulo se basará en la misma idea de dividir el triángulo en uno con la parte inferior plana y otro con la parte superior plana. Sin embargo ahora, en lugar de dibujar el scanline con una línea de un color sólido, tendremos que dibujar individualmente cada píxel. Esta es nuestra primera tarea, una vez la tengamos podremos pensar cómo calcular el color de la textura para aplicarlo.
Así que vamos a empezar renderizando nuestro triángulo texturizado píxel a píxel con un color sólido.
Primero el triángulo superior, teniendo en cuenta que también debemos intercambiar las coordenadas UV:
void Window::SwapTextures(Texture2 *a, Texture2 *b)
{
    Texture2 tmp = *a;
    *a = *b;
    *b = tmp;
}

void Window::DrawTexturedTriangle(int x0, int y0, Texture2 t0, int x1, int y1, Texture2 t1, int x2, int y2, Texture2 t2, uint32_t* texture)
{
    // Iterar todos los píxeles del triángulo para renderizarlos en función del color de la textura

    // Reordenamiento de los vértices y las UV coords: y0 < y1 < y2
    if (y0 > y1) // Primer intercambio
    {
        SwapIntegers(&y0, &y1);
        SwapIntegers(&x0, &x1);
        SwapTextures(&t0, &t1);
    }
    if (y1 > y2) // Segundo intercambio
    {
        SwapIntegers(&y1, &y2);
        SwapIntegers(&x1, &x2);
        SwapTextures(&t1, &t2);
    }
    if (y0 > y1) // Tercer intercambio
    {
        SwapIntegers(&y0, &y1);
        SwapIntegers(&x0, &x1);
        SwapTextures(&t0, &t1);
    }

    /*** Render the upper part of the triangle (flat bottom) ***/
    {
        float m1 = 0;
        float m2 = 0;
        // Checks to avoid infinite divisions
        if (y1 - y0 != 0) m1 = -((y1 - y0) / static_cast<float>((x0 - x1)));
        if (y2 - y0 != 0) m2 = (y2 - y0) / static_cast<float>((x2 - x0));
        if (y1 - y0 != 0)
        {
            for (size_t i = 0; i < (y1 - y0); i++)
            {
                int xStart = x0 + (i / m1);
                int xEnd = x0 + (i / m2);
                int y = y0 + i;

                // Sometimes we have to draw the triangle from right to left
                // so we have to swap the xStart and the xEnd
                if (xEnd < xStart) SwapIntegers(&xEnd, &xStart);

                for (int x = xStart; x < xEnd; x++)
                {
                    DrawPixel(x, y, (x % 2 == 0) ? 0xFFFFF00FF : 0xFF000000);
                }
            }
        }
    }
}
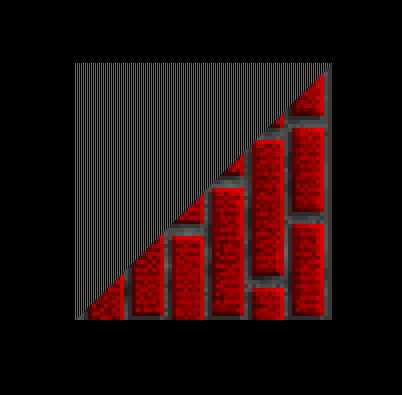
Si todo está correcto deberíamos dibujar por ahora los triángulos con parte inferior plana:
Haremos lo propio con el triángulo con la parte superior plana:
/*** Render the lower part of the triangle (flat top) ***/
{
    float m1 = 0;
    float m2 = 0;
    // Checks to avoid infinite divisions
    if (y2 - y1 != 0) m1 = -((y2 - y1) / static_cast<float>((x2 - x1)));
    if (y2 - y0 != 0) m2 = -((y2 - y0) / static_cast<float>((x2 - x0)));
    if (y2 - y1 != 0)
    {
        for (size_t i = 0; i <= (y2 - y1); i++)
        {
            int xStart = x2 + (i / m1);
            int xEnd = x2 + (i / m2);
            int y = y2 - i;

            // Sometimes we have to draw the triangle from right to left
            // so we have to swap the xStart and the xEnd
            if (xEnd < xStart) SwapIntegers(&xEnd, &xStart);

            for (int x = xStart; x < xEnd; x++)
            {
                DrawPixel(x, y, (x%2 ==0) ? 0xFFFFF00FF : 0xFF000000);
            }
        }
    }
}
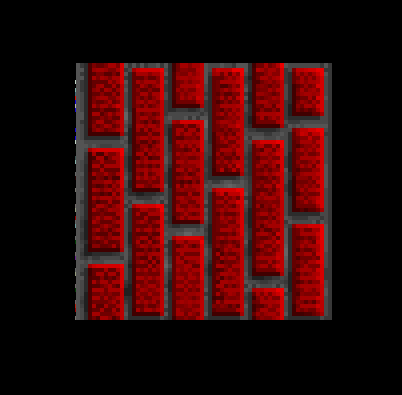
Y ya tendremos los triángulos renderizados pixel a pixel:
En este punto estamos listos para el siguiente paso, aprender cómo aplicar los texels sobre los píxeles mediante sus coordenadas UV.
Coordenadas baricéntricas
Para determinar qué texel dibujar en cada píxel tendremos que realizar la interpolación de las coordenadas UV de los triángulos:
Lo que utilizaremos para determinar ese texel son las coordenadas baricéntricas del triángulo:
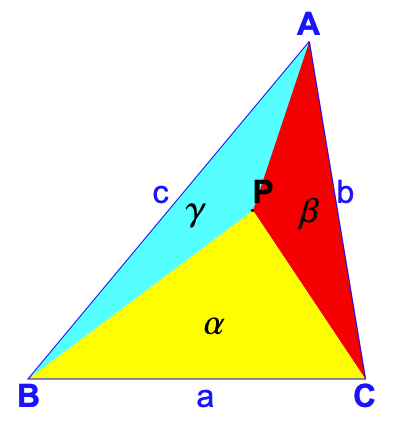
De manera que cualquier punto en el interior del triángulo puede ser representado por tres coordenadas baricéntricas (α, β, γ) cuya suma es: α + β + γ = 1.
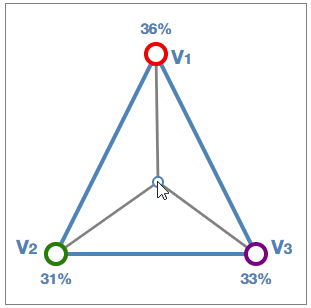
La siguiente animación muestra un porcentaje dependiendo del peso que tiene cada área (α, β, γ) para un punto P:
La fórmula que aplica los pesos de las coordenadas baricéntricas a los vectores A, B y C es:
Con ella podremos encontrar texel pero antes deberemos saber cómo calcular el valor de cada área.
Pesos baricéntricos
Dado el siguiente triángulo:
El peso de α es igual al área del triángulo BPC entre el área del triángulo completo ABC:
Otra forma de verlo sería como el área del paralelogramo BPC/2 entre el área del paralelogramo ABC/2:
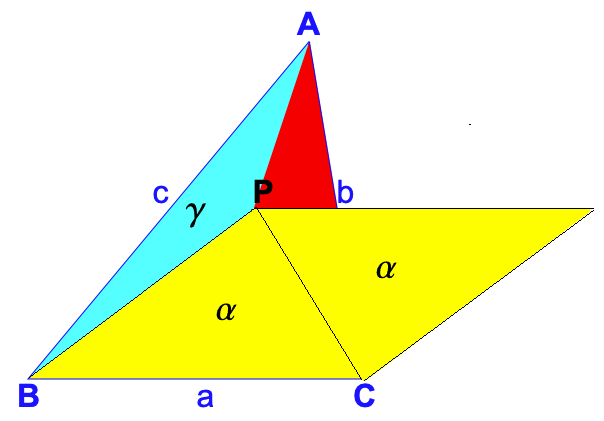
Según vimos anteriormente el área del paralelogramo se corresponde con el producto vectorial, por lo que también podemos encontrar α de esa forma:
Siguiendo la misma lógica encontraremos β:
Y para γ no necesitamos realizar el cálculo, nos basta con saber que:
Con todo esto ya podemos codificar un método para calcular los pesos baricéntricos a partir de 4 vectores A, B, C y P cuyo resultado será un Vector3 de factores que sumados siempre será 1:
static Vector3 BarycentricWeights(Vector2 a, Vector2 b, Vector2 c, Vector2 p)
{
    // Find vectores between the vertices ABC and point P
    Vector2 ab = b - a;
    Vector2 bc = c - b;
    Vector2 ac = c - a;
    Vector2 ap = p - a;
    Vector2 bp = p - b;

    // Calculate the full triangle ABC area using cross product (area of paralelogram)
    float areaTriangleAbc = (ab.x * ac.y - ab.y * ac.x);

    // Weight alpha is area of subtriangle BCP divided by area of full triangle ABC
    float alpha = (bc.x * bp.y - bp.x * bc.y) / areaTriangleAbc;

    // Weight beta is area of subtriangle ACP divided by area of full triangle ABC
    float beta = (ap.x * ac.y - ac.x * ap.y) / areaTriangleAbc;

    // Wieght gamma is found really easy
    float gamma = 1 - alpha - beta;

    Vector3 weights = {alpha, beta, gamma};
    return weights;
}
Para hacer uso de esta función utilizaremos un nuevo método en el renderizado que substituirá a DrawPixel, se llamará DrawTexel:
void Window::DrawTexel(int x, int y, Vector2 a, Vector2 b, Vector2 c, Texture2 t0, Texture2 t1, Texture2 t2, uint32_t *texture, Window *window)
{
    // Create p vector with current pixel location
    Vector2 p{ static_cast<double>(x),static_cast<double>(y) };
    // Calculate the weights using the vectors A,B,C and P
    Vector3 weights = Vector3::BarycentricWeights(a, b, c, p);
    float alpha = weights.x;
    float beta = weights.y;
    float gamma = weights.z;

    // Calculate the interpolations multipling every UV coord per its weight factor
    float interpolatedU = t0.u * alpha + t1.u * beta + t2.u * gamma;
    float interpolatedV = t0.v * alpha + t1.v * beta + t2.v * gamma;;

    // Calculate the texelX and texelY based on the interpolated UV and the texture sizes
    int texelX = abs(static_cast<int>(interpolatedU * window->textureWidth));
    int texelY = abs(static_cast<int>(interpolatedV * window->textureHeight));

    // Finally draw the pixel with the color stored in our texture harcoded array
    DrawPixel(x, y, texture[(window->textureWidth * texelY) + texelX]);
}
Los valores que le pasaremos son los siguientes, teniendo que definir préviamente los Vector2 con A, B y C:
void Window::DrawTexturedTriangle(int x0, int y0, Texture2 t0, int x1, int y1, Texture2 t1, int x2, int y2, Texture2 t2, uint32_t* texture)
{
    //...

    // Create vector points for texturing after sorting the vertices
    Vector2 pA{ static_cast<double>(x0), static_cast<double>(y0) };
    Vector2 pB{ static_cast<double>(x1), static_cast<double>(y1) };
    Vector2 pC{ static_cast<double>(x2), static_cast<double>(y2) };

    /*** Render the upper part of the triangle (flat bottom) ***/
    {
        // ...
        if (y1 - y0 != 0)
        {
            for (size_t i = 0; i < (y1 - y0); i++)
            {
                // ...
                for (int x = xStart; x < xEnd; x++)
                {
                    // Draw the current texel
                    DrawTexel(x, y, pA, pB, pC, t0, t1, t2, texture, this);
                }
            }
        }
    }
}
El resultado debería ser el texturizado sobre los triángulos con parte inferior plana:
Si substituimos la parte que nos falta para dibujar el texel en lugar del píxel sólido deberíamos texturizar el cubo completo:
/*** Render the lower part of the triangle (flat top) ***/
for (int x = xStart; x < xEnd; x++)
{
    //DrawPixel(x, y, (x%2 ==0) ? 0xFFFFF00FF : 0xFF000000);
    DrawTexel(x, y, pA, pB, pC, t0, t1, t2, texture, this);
}
Si nos fijamos notaremos que ocurre un efecto algo extraño en las texturas, la razón es que no estamos aplicando la perspectiva en el texturizado, un tema que trataré próximamente.
Última edición: 05 de Junio de 2022